How do you design a process that meets the needs and requirements of all stakeholders, departments and disciplines? How do you describe a process that actually gets executed the way it was conceived?
When it comes to designing and describing processes, there is no standard approach. Each company has its own way of working, and each process is unique.
However, there are a few key steps you can follow to create a process description that meets the needs of all stakeholders. That way, you’ll guarantee the best execution of the process!
In this blog post, we will therefore explore the Process Model Canvas: a tool designed to help you design and describe processes with the help of all stakeholders.
We’ll also look at how to use the PMC in practice, so you can start designing better processes with colleagues right away!
What is a process description?

Before we dive into the application of the Process Model Canvas, it is helpful to first consider the meaning of the term “process description.”
At first glance it seems unambiguous, but actually the term process description has two meanings.
First, it can be used as a container term for all methods used to document or study a process. In this case, it is also interspersed with terms such as “process modeling,” and “process mapping.”
The second meaning is a specific form of the first, namely “a process description.” This involves mapping a process through text.
It can be as simple as a paragraph describing how to make a cup of coffee, or as complex as a multi-page document detailing the steps of a manufacturing process.
When we talk about “process descriptions” in this blog, we mean the first meaning, i.e. process descriptions as an umbrella term. So that means that the process can also be mapped out graphically.
Different models for process descriptions
We can imagine that you can’t see the wood for the trees in all the different models that you can use to map processes. Think of models like value stream mapping, swimlanes, a workflow design, the waterfall model and SIPOC.
If your organization wants to work on a process basis, it is important that you choose a method that 1) suits your organization well, and 2) suits the goal.
Is your goal to improve collaboration between colleagues and support processes with IT tools? Then we recommend you to work with a combination of the waterfall model and SIPOC.
Waterfall Model
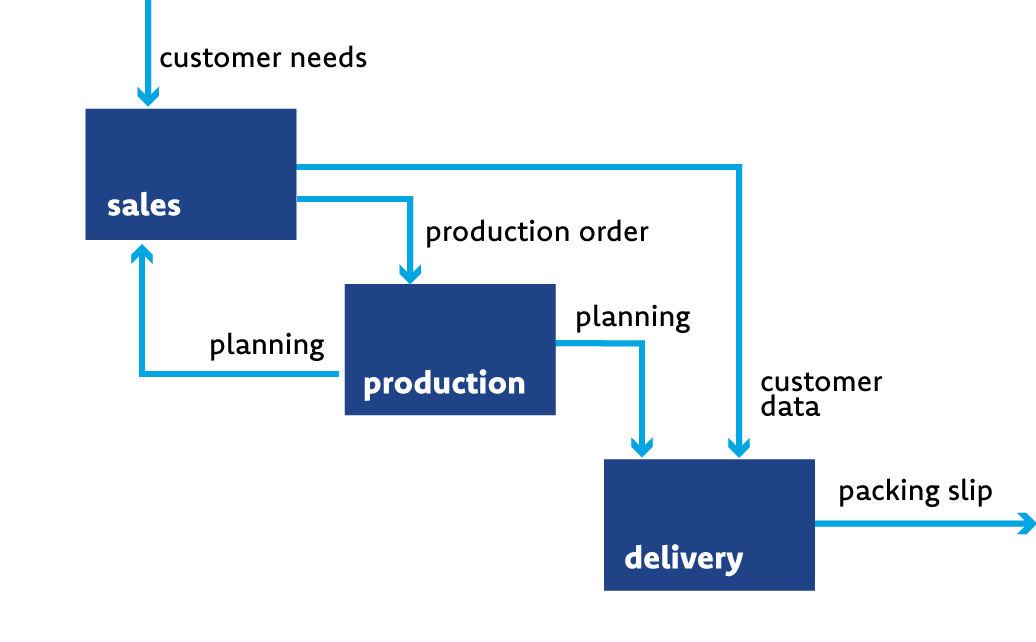
The waterfall methodology or the waterfall model is a sequential process description method. This means that each phase must be completed before the next phase can begin.
The advantage of this is that it is clear what needs to be done and when. This ensures that collaboration runs smoothly and that everyone knows what is expected of them.
SIPOC
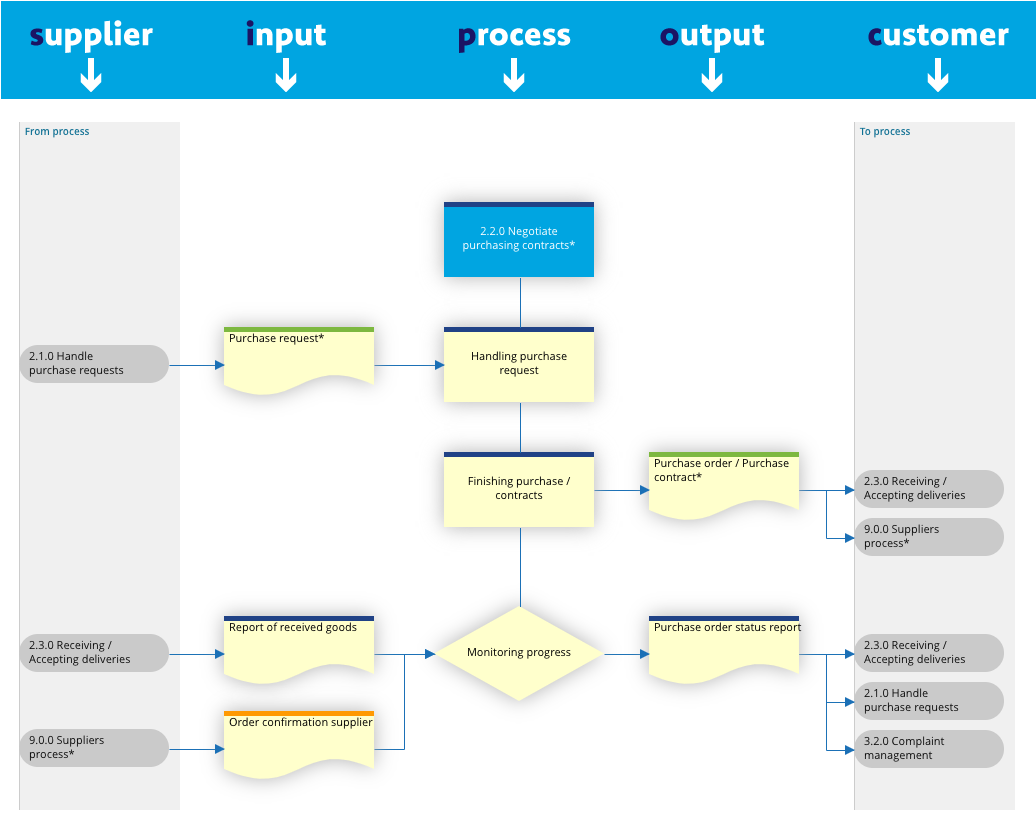
The SIPOC model (supplier, input, process, output, customer) then helps you map out the information flows. You can therefore use it in combination with the waterfall model.
This method is ideal if you have an organization that works in a highly decentralized manner. Think of companies with many different departments or project teams.
By applying the SIPOC method you gain insight into all information flows and you know exactly which input is required from which department or project team in order to deliver a certain output.
Designing and describing processes: what is the Process Model Canvas and why do you use it?
You are now familiar with the different models you can use to describe processes. But actually creating a process description, that’s an art in itself.
That is why we at Comm’ant have developed the Process Model Canvas (PMC): a tool that helps you to design processes together with the stakeholders.
The purpose of the PMC is simple: to make it accessible to design and describe processes together with stakeholders. A process should not be thought out in isolation, but involve the people who will use it in their daily work.
By making them co-architects, you ensure that the process is actually implemented in the way it was conceived and that it leads to the desired results.
Download » Process Model Canvas template
The Process Model Canvas is thus a tool that helps you to:
- Describe a process in a structured way; Involve all relevant disciplines and teams in the design of the process;
- Improve communication about the process;
- Ensure that there is a solid foundation for learning and improvement in practice;
- Ensure that the process leads to the desired results.
Before we move on to the “how” of the Process Model Canvas, it is good to take a moment to consider the “what” of the PMC. After all, where in the organization can you apply it?
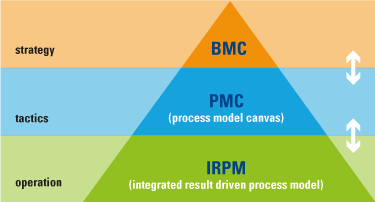
You’re probably already familiar with the Business Model Canvas, a tool for determining organizational strategy. But how do you then put that strategy into practice? How do you ensure that there are processes in place that guarantee the quality you have strategically envisioned?
That’s where the Process Model Canvas comes in. A tool that can be used at the tactical level of the organisation to actually achieve the results that have been set at the strategic level.
How do you use the Process Model Canvas
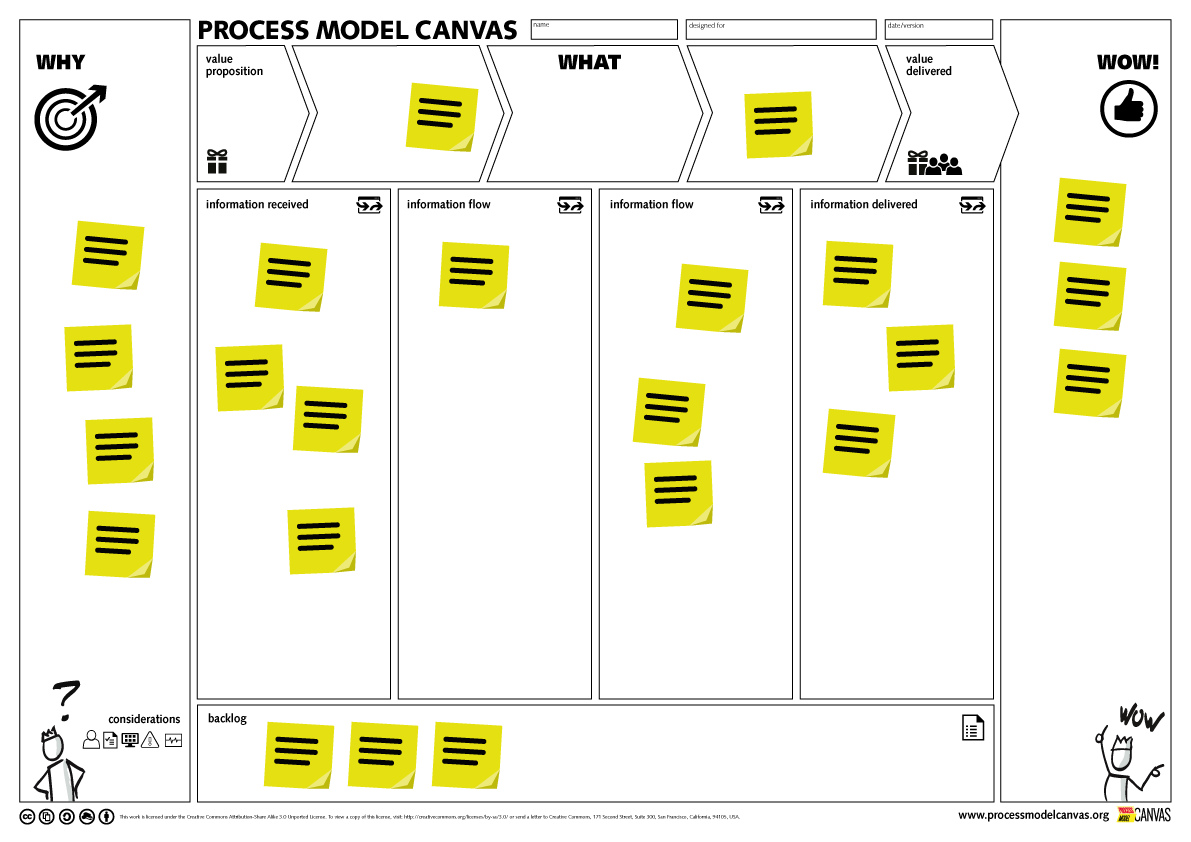
To get started with the PMC, it is important to first download the template. Then you can immediately apply all the steps we discuss in this blog together with the process team!
Note: Some processes may be so lengthy and complex, that it may be necessary to put several templates side by side. So it is not necessary that all information fits in 1 template.
Once you’ve downloaded the template, print it out in a large format so you can get creative with the team on stickering. Do you prefer to work digitally?
Then try a tool like Miro for the creative brainstorming part, and then add the end result to your Comm’ant Process Management System (but more on that later).
First, it can be used as a container term for all methods used to document or study a process. In this case, it is also interspersed with terms such as “process modeling,” and “process mapping.”
The second meaning is a specific form of the first, namely “a process description.” This involves mapping a process through text.
It can be as simple as a paragraph describing how to make a cup of coffee, or as complex as a multi-page document detailing the steps of a manufacturing process.
When we talk about “process descriptions” in this blog, we mean the first meaning, i.e. process descriptions as an umbrella term. So that means that the process can also be mapped out graphically.
Different models for process descriptions
We can imagine that you can’t see the wood for the trees in all the different models that you can use to map processes. Think of models like value stream mapping, swimlanes, a workflow design, the waterfall model and SIPOC.
If your organization wants to work on a process basis, it is important that you choose a method that 1) suits your organization well, and 2) suits the goal.
Is your goal to improve collaboration between colleagues and support processes with IT tools? Then we recommend you to work with a combination of the waterfall model and SIPOC.
Waterfall Model

The waterfall methodology or the waterfall model is a sequential process description method. This means that each phase must be completed before the next phase can begin.
The advantage of this is that it is clear what needs to be done and when. This ensures that collaboration runs smoothly and that everyone knows what is expected of them.
SIPOC

The SIPOC model (supplier, input, process, output, customer) then helps you map out the information flows. You can therefore use it in combination with the waterfall model.
This method is ideal if you have an organization that works in a highly decentralized manner. Think of companies with many different departments or project teams.
By applying the SIPOC method you gain insight into all information flows and you know exactly which input is required from which department or project team in order to deliver a certain output.
Designing and describing processes: what is the Process Model Canvas and why do you use it?
You are now familiar with the different models you can use to describe processes. But actually creating a process description, that’s an art in itself.
That is why we at Comm’ant have developed the Process Model Canvas (PMC): a tool that helps you to design processes together with the stakeholders.
The purpose of the PMC is simple: to make it accessible to design and describe processes together with stakeholders. A process should not be thought out in isolation, but involve the people who will use it in their daily work.
By making them co-architects, you ensure that the process is actually implemented in the way it was conceived and that it leads to the desired results.
Download » Process Model Canvas template
The Process Model Canvas is thus a tool that helps you to:
- Describe a process in a structured way; Involve all relevant disciplines and teams in the design of the process;
- Improve communication about the process;
- Ensure that there is a solid foundation for learning and improvement in practice;
- Ensure that the process leads to the desired results.
Before we move on to the “how” of the Process Model Canvas, it is good to take a moment to consider the “what” of the PMC. After all, where in the organization can you apply it?

You’re probably already familiar with the Business Model Canvas, a tool for determining organizational strategy. But how do you then put that strategy into practice? How do you ensure that there are processes in place that guarantee the quality you have strategically envisioned?
That’s where the Process Model Canvas comes in. A tool that can be used at the tactical level of the organisation to actually achieve the results that have been set at the strategic level.
How do you use the Process Model Canvas

To get started with the PMC, it is important to first download the template. Then you can immediately apply all the steps we discuss in this blog together with the process team!
Note: Some processes may be so lengthy and complex, that it may be necessary to put several templates side by side. So it is not necessary that all information fits in 1 template.
Once you’ve downloaded the template, print it out in a large format so you can get creative with the team on stickering. Do you prefer to work digitally?
Then try a tool like Miro for the creative brainstorming part, and then add the end result to your Comm’ant Process Management System (but more on that later).
Download » Process Model Canvas template
Step 1: Start with a happy customer
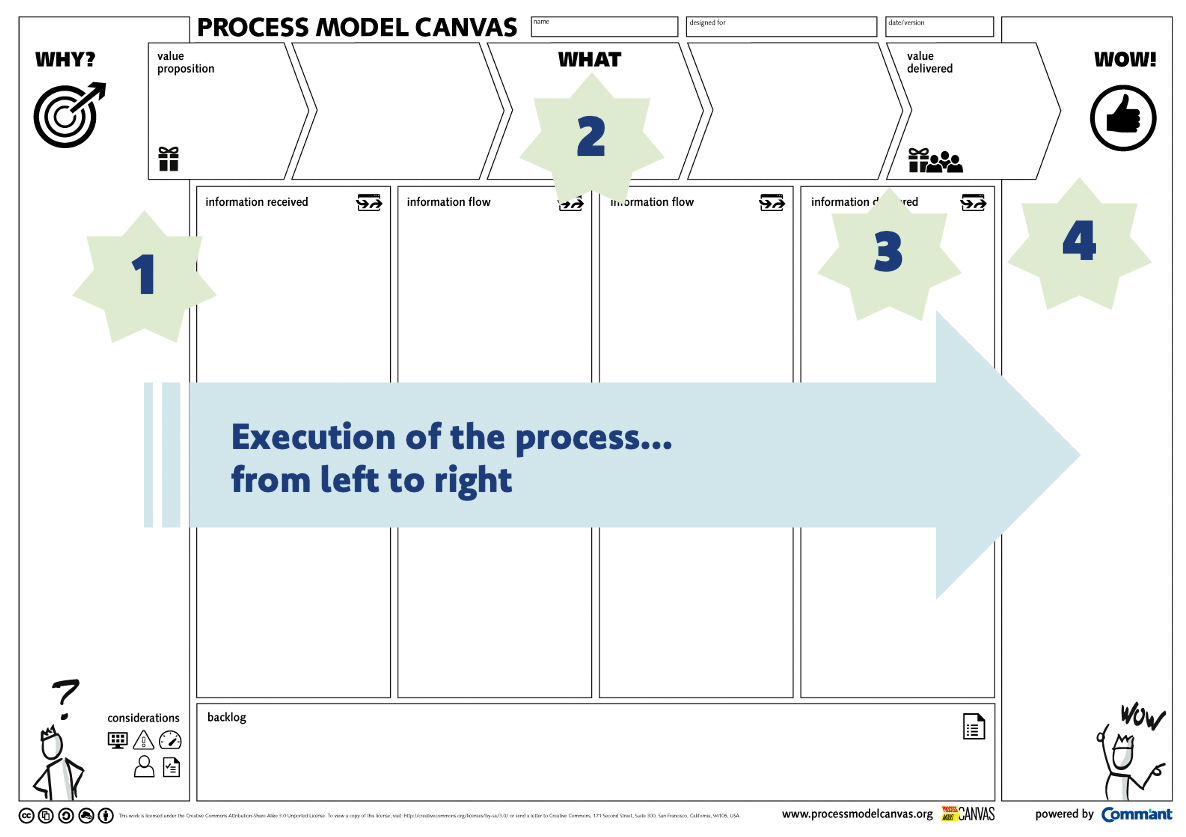
At the end of the exercise, when you have finished designing and describing the process, the process will be executed from “left” to “right.” However, this is not how you think out a process.
If you were to start by thinking out the process from the starting point, you will encounter so many different variables and options that you will probably get dizzy. And most of these are probably not even relevant to the end result.
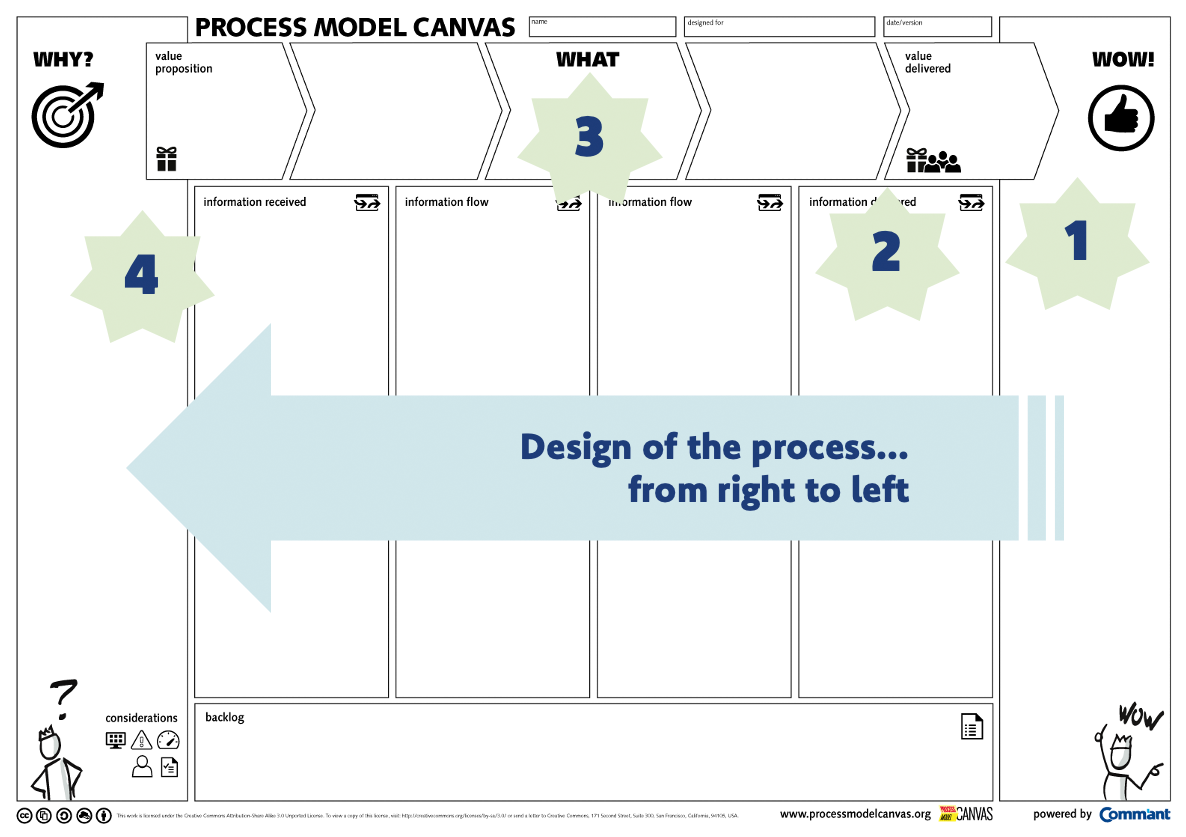
So, when you start designing the process, you therefore start on the right side, namely at the happy customer (“WOW”). In the image, this is indicated by number 1.
Number 1 – WOW: Here you think about what the distinctive value is that you deliver to the customer or stakeholder. Who are the stakeholders (customer, colleague, supplier)? What are the “Wow!” factors for them?
In other words, what is the output of the entire process?
Do you want to get the most out of the PMC? If you want to create an advanced version of the PMC, you can draw horizontal lines and divide the PMC vertically based on the customer journey. For example:
- The recipient is a lead / prospect and looking for a product / service
- The recipient is a new customer and is ordering
- The recipient is an existing customer that you want to retain or grow
- The recipient has an issue or a complaint
In that case, determine for each phase what the desired outcome is that produces a happy “recipient”.
Step 2: Gather key information transfers
Once you have determined the desired output for the customer, you can start working your way back to the starting point of the process. In other words, what are all the steps necessary to achieve this?
So number two is about the information you need in your process to ensure a happy customer. What information do you need to deliver to the customer? What information do you need from your customers? And what internal information do you need to deliver a “WOW” experience to the customer?
Think of information such as promotional info, price info, quote info, information about delivery times. You reason from the end point – the happy customer – back to the starting point: the input needed to start the process.
Take for example a web store: the starting point could be an order form that is filled in by the customer with the desired product info.
When filling out the PMC, the goal is to understand the building blocks of your process, not the details. Only after you are completely done filling out the PMC do you specify the following per “information transfer message”:
- Name
- Minimum content required
- Other considerations, such as: the roles (who makes the input and who receives the input), objectives and performance agreements, required IT systems, quality aspects, risks and control measures.
Step 3: What are the most important (sub)processes in the chain?

Now that you know what information is needed to achieve the desired output for your customers, it’s time to think about what processes are needed to generate this info.
In doing so, make sure that the information flows you came up with in Step 2 are placed under the matching process titles in which the information or output is created.
The title of a process in step 3 always contains a verb. For example, “check stock.” That (sub)process checks whether the desired product is in stock.
Step 4: Validate the “why” and expand to include management aspects
Continuously mirror everything you fill in with the already known identity of your company. What is your identity? Why should a customer come to you? Why do we even have this process? What makes you unique?
What are you focusing on as a company: customer intimacy, operational excellence, product leadership?
If you work for a discount store you will make other choices in your processes and information flows than if it is an exclusive boutique store. After all, your added value for the customer lies elsewhere.
So be aware of this when determining the information flows and matching (sub) processes.
Now it is time to also add the management aspects per output that we also briefly touched upon in point 2:
- Name
- Minimum content required
- Other considerations, such as: the roles (who makes the input and who receives the input), objectives and performance agreements, required IT systems, quality aspects, risks and control measures.
Ready to put the process into action!
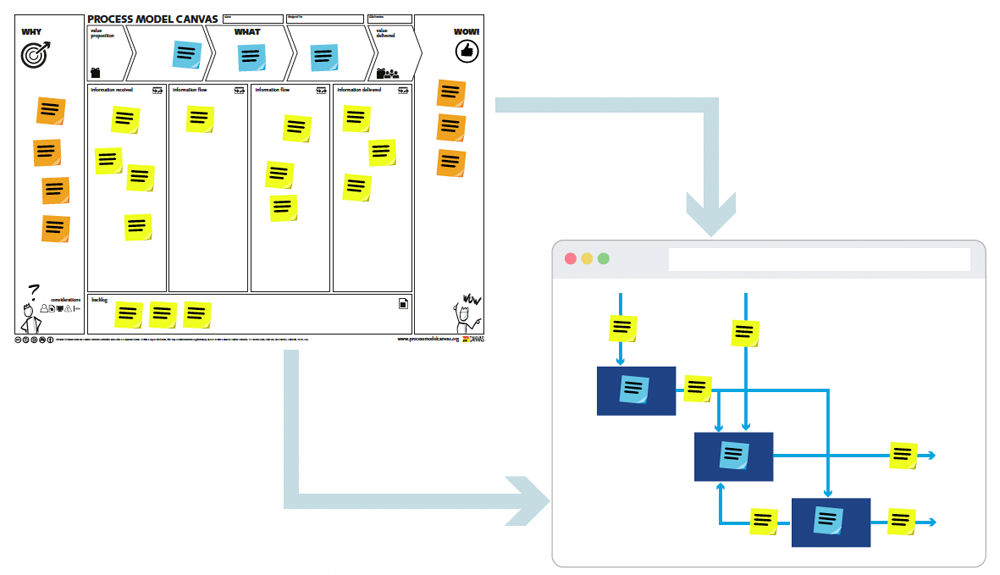
Now that you’ve described the process and made process agreements, it’s time to put it into action! Make sure that all stakeholders understand the process and know their roles.
It is therefore important to convert the process design into a process model (such as the waterfall model in combination with SIPOC) and to store the information in a place that is accessible to everyone.
To do this, you can use comprehensive process management software such as Comm’ant that is specifically designed to map complex processes in an orderly fashion and make them accessible to all colleagues.

